Can You Get a Sample Before a Full Production Run? A Design Engineer’s Guide
03 Nov 2026
navinyasanew
9 min read
Short answer: yes, and you should insist on one. Any serious manufacturer, whether a moulder, a die caster or a sheet metal shop, can make sample parts from the production tool before the full run starts. The real question is which sample you’re asking for, and what you check when it lands on your desk.
If you’ve ever approved a drawing, waited six weeks for a tool, and then found that the clip doesn’t snap or the boss has a sink mark, you already know why this matters. A tool is expensive to change once it’s hardened. A sample is the cheapest moment to find out that something is wrong.
This guide walks through the samples you’ll meet between CAD and mass production, what each one actually proves, and a checklist you can use before you sign anything off.
Prototype, pre-production sample or pilot run: what’s the difference?
People use “sample” for all three, and that’s where confusion starts. Each one answers a different question, and each one is made a different way.
Prototype
Pre-production sample
Pilot run
What it answers
Does the design work?
Does the production tool make the part right?
Can the factory make it right, every time, at speed?
How it’s made
3D printing, CNC machining, soft or bridge tooling
The real production tool and the real material
The real tool, line, operators and cycle time
Typical quantity
1 to a few dozen
A handful to a few hundred
Hundreds to a few thousand
What it can’t tell you
Shrinkage, sink, warpage, weld lines, real tolerances
Whether the process stays stable over a shift
Very little; this is the last gate
Who signs it off
Design team
Design and quality, often with the customer
Quality, production and the customer
A 3D printed prototype is great for checking fit and ergonomics. It tells you almost nothing about how a moulded or cast part will behave. A printed snap fit and a moulded one in PC/ABS bend very differently, which is exactly why the pre-production sample exists.
So when someone asks “can the supplier make a sample before the full run?”, they usually mean the middle column: parts off the production tool, in the production material, before volume starts.
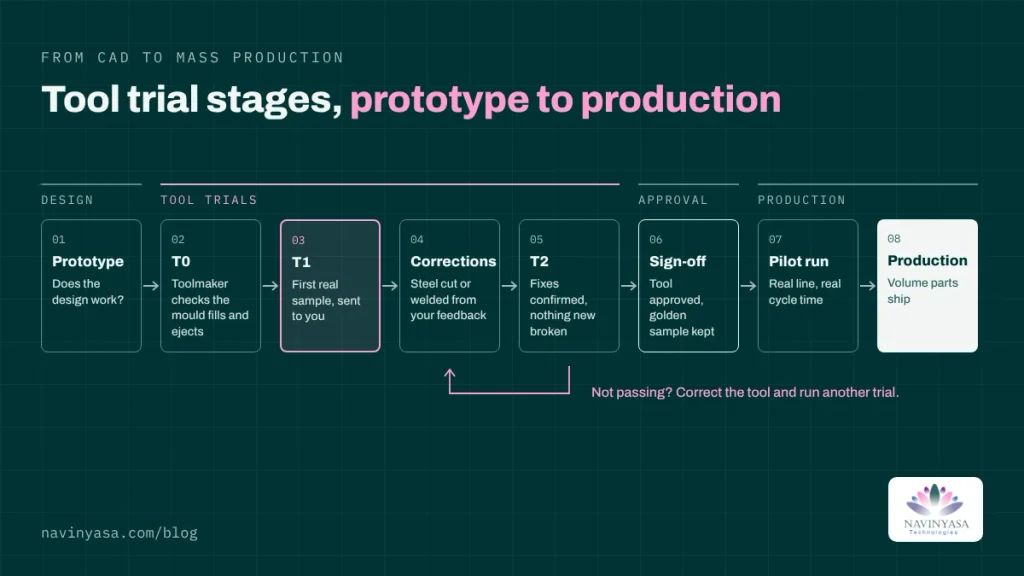
T0, T1, T2: how tool samples work
In injection moulding, samples come in rounds called trials. You’ll see them on every tooling schedule, so it helps to know what each one is for.
T0, the first shots. The toolmaker’s own check that the mould fills, opens, closes and ejects. Parts may have flash, short shots or rough surfaces. Many toolmakers don’t send T0 parts to the customer at all.
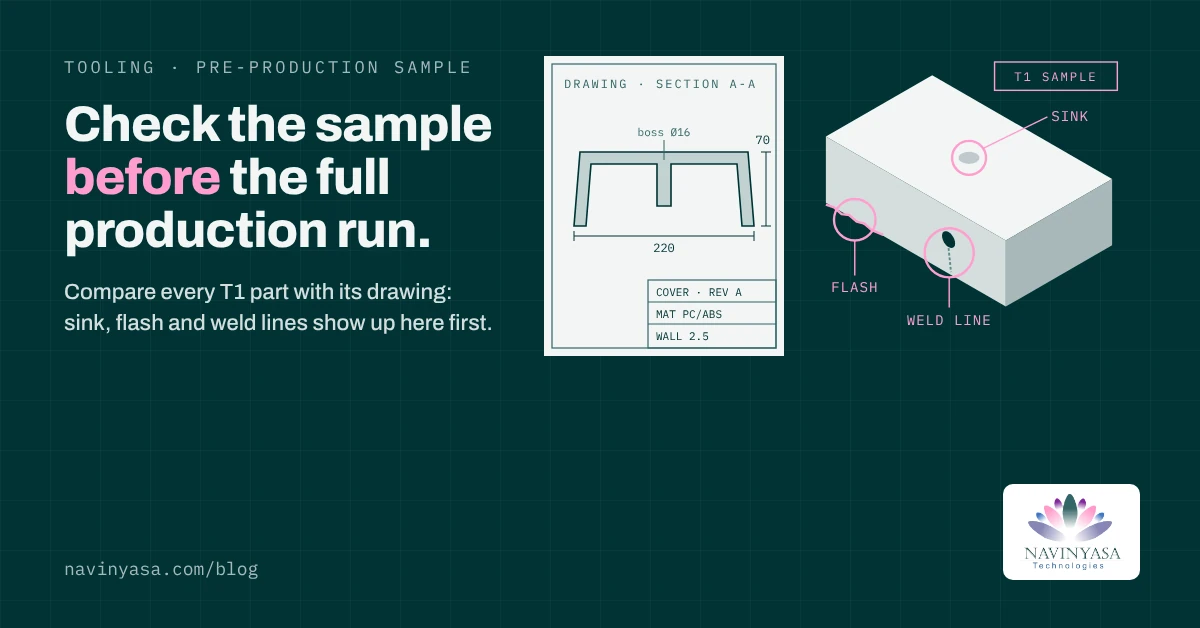
T1, the first real sample. Moulded in the actual material under production-like settings. This is usually the first sample you receive. Expect to find something: sink marks, weld lines, ejector pin marks, a dimension out, a clip that’s too tight. As one tooling guide puts it, it is nearly impossible to have perfect parts on the first run.
Tool corrections. The toolmaker cuts or welds steel based on your T1 feedback and the measurement report.
T2 (and T3 if needed). A verification round to confirm the fixes worked and nothing new broke. Sign-off usually happens here.
Tool approval, then pilot run. Only now does the tool go to production.
A tip that saves weeks: ask the toolmaker to cut critical features “steel safe”. That means leaving a little extra steel where a fit or dimension is uncertain, such as a snap fit hook or a boss diameter. Removing steel after T1 is quick. Adding it back means welding, which is slower, costlier and can show on the part.
Die casting follows the same idea: first shots from the die, a dimensional report, die corrections, then a second sample. Watch the parting line and draft areas closely, because that’s where flash, drag marks and the widest tolerances show up.
Sheet metal is a little different. Early samples are often laser cut and bent on a press brake, while the production part may come from a progressive die. Bend allowance and hole position can shift between the two, so the first parts off the real die need their own check.
What to check on a pre-production sample
Don’t just look at the sample and say “looks good”. Go through it the same way every time. Here’s the checklist we use with our trainees.
1. Critical dimensions
Ask for a dimensional report that covers every dimension on the drawing, not just a few.
Measure the critical-to-function ones yourself, or watch them being measured on a CMM.
Check more than one part. If the tool has several cavities, check one from each.
2. Fit with mating parts
Assemble the sample with the real mating parts, not CAD.
Snap fits: do they engage, hold, and release the way you designed them? A snap fit that cracks on assembly usually means the strain is too high, not that the plastic is bad.
Screw bosses: drive a screw in and out a few times and look for cracks.
3. Draft and ejection marks
Look for drag marks or scuffing on walls with little or no draft.
Check where the ejector pins left marks. Are they on a visible face?
4. Parting line and flash
Run a finger along the parting line. Flash means a trimming step or a tool fix.
Any dimension that crosses the parting line will have a looser tolerance. Check those first.
5. Moulding and casting defects
Plastic: sink marks behind ribs and bosses, weld lines near holes, short shots, warpage on long flat walls.
Casting: porosity in thick sections (cut a sample open if it’s a pressure part), cold shuts, misruns.
6. Material, colour and finish
Confirm the material grade on the certificate matches the drawing.
Compare colour and texture against an agreed reference under the same light.
7. Function and abuse
Drop it, flex it, heat it if the product will see heat. A part that passes inspection can still fail in the user’s hand.
Once a sample passes, keep a few signed and dated parts as the approved reference, often called a golden sample. When a production batch looks different six months later, that’s what you compare against.
First article inspection and PPAP, in plain words
If you work with automotive or aerospace customers, sample approval gets formal. Two terms come up all the time.
First article inspection (FAI) is a full, documented check of the first parts made with the production process against every requirement on the drawing. In aerospace, it follows the AS9102 standard, which uses three forms:
Form 1, part number accountability: which part, which revision, and any sub-parts.
Form 2, product accountability: materials, special processes such as heat treatment or plating, and functional tests.
Form 3, characteristic accountability: every dimension, tolerance and note, each numbered on a ballooned drawing with its measured result.
An FAI isn’t a one-time thing. It’s typically repeated after a design change, a change of material or supplier, a change of process, tooling or location, or when the part hasn’t been made for two years.
PPAP (Production Part Approval Process) is the automotive version, developed by the Automotive Industry Action Group (AIAG) with Ford, GM and Chrysler. It goes beyond the parts themselves and asks the supplier to prove the process can produce good parts consistently, when run at the quoted production rate. A full package has 18 elements, from design records and the control plan to capability studies and the signed Part Submission Warrant (PSW). There are five submission levels, and Level 3, with samples plus the full data package, is the usual default.
You don’t need to memorise the 18 elements as a design engineer. You do need to know that your drawing is what everything gets checked against. A missing tolerance, an unclear datum or an undimensioned feature will show up here, and fixing it at this stage costs far more than getting it right on the drawing.
That last point links back to fixtures, by the way. A part that is measured in a CMM or inspection fixture has to be located the same way every time, which is where the 3-2-1 principle of location comes in.
8 questions to ask your supplier before the production run
Ask these when you place the tooling order, not when the parts are late.
How many tool trials are included in the price, and what does an extra round cost?
Will I get T1 samples in the production material and colour?
Will you send a full dimensional report with the samples? CMM or manual?
Can you cut the critical features steel safe?
How many sample parts will you send, and from which cavities?
Who signs off the sample on your side, and who on ours?
Will you keep a signed golden sample at your end too?
Is a pilot run planned before full volume, and will its parts be inspected?
If a supplier hesitates on questions 1 to 3, that tells you something. Good shops expect them.
Common mistakes we see
Approving from photos. A photo hides sink, flash and fit problems. Get parts in hand.
Checking one part. One good part proves the tool can make a good part once. Check several, from every cavity.
Changing the design after T1 without telling anyone the impact. Every change after the tool is cut costs time. Decide what’s a must-fix and what can wait.
Skipping the pilot run to save a week. Problems that appear at full speed, like warpage from a shorter cooling time, only show up when the process runs at rate.
Frequently asked questions
Can a manufacturer produce a sample before a full production run?
Yes. Making samples from the production tool before volume production is standard practice in moulding, casting and sheet metal. Ask for it in writing when you order the tool.
What is a pre-production sample?
A part made with the real production tool, material and process, before mass production starts. It proves the tool makes the part to the drawing.
What is the difference between a prototype and a pre-production sample?
A prototype checks the design and is usually 3D printed or machined. A pre-production sample checks the production tool and process, so it shows real shrinkage, sink and tolerances.
What do T0, T1, and T2 mean?
They’re injection mould trial rounds. T0 is the toolmaker’s first check, T1 is usually the first sample sent to the customer, and T2 confirms the corrections made after T1.
Who pays for extra sample rounds?
It depends on the quote. Trials are often included up to a set number. Extra rounds caused by design changes are commonly charged to the customer, so agree on this up front.
Learn to design parts that pass on the first sample
Most sample failures trace back to the design: missing draft, walls that are too thick, a parting line in the wrong place, or a tolerance nobody can hold. At Navinyasa we teach mechanical engineers to design for the tool from day one, in our Plastic, Casting and Sheet Metal design training. And if you need help taking a product from prototype to production, our Industrial Design Studio supports design, prototypes and manufacturing.
Want to see how design-ready training works? Book a free demo with our team in Bengaluru.
Book a Free Demo. See What Design-Ready Training Looks Like.
Build practical mechanical design skills through domain-focused training in Plastic, Casting and Sheet Metal/BIW with live project exposure, manufacturing knowledge and mentor guidance.
Upcoming batches have limited seats. Book a free demo to understand the program structure, domain options and learning approach.
See How Domain Training Can Strengthen Your Design Career.
CAD software knowledge is only the starting point. Explore how practical training in Plastic, Casting and Sheet Metal/BIW, manufacturing processes and live projects can help you move toward design-ready skills.
Upcoming batch • Limited training seats. Book a free demo to understand the training approach before you decide.